I've enjoyed eight great years of interaction with thousands of other small travel trailer owners. Thanks for all your support, and hopefully a few of us will meet again somewhere in the woods or on the road! - Denny
So What is That?
This is the common question I hear when people are looking at our trailer and spot the device above. Being a do-it-yourselfer, I have a tendency to think outside the box when coming up with new projects. This is one of those that really worked out well. It's the key to improving our TV reception when traveling with our small travel trailer.

Our Simple TV Antenna for our Small Travel Trailer
My Original "Simple" TV Solution for our Small Travel Trailer
Our Casita was pre-wired for TV and cable when we purchased it. In other words, the factory ran a cable from the inside to the outside of the trailer, and mounted a connector at each end. This is perfect when we are staying places that have cable, but unfortunately, that doesn't describe most of the places where we stay.
So several years ago, I went hunting for a simple solution and found this little antenna on Amazon. It collapses to about 6 inches, so it's really easy to store in a drawer inside. It expands to about 12 inches, and has a connector that simply pushes onto the trailer's outside connector. It's quick and easy, dirt cheap, and works well when we are staying in cities that have nearby TV stations. In fact, we stayed one place on our last trip where we were able to pick up over 10 channels with this little antenna.
But if we are any distance from the stations, it doesn't work well. It may pick up some channels, but often they will break up and not be very watchable. After a few years of putting up with it, I decided I wanted a better solution. I know there are special RV antennas that mount to the roof, but that was more than I wanted to get into. After a lot of searching and thinking, I came up with an improved solution that works pretty well.

The antenna for our improved TV reception with our small travel trailer
My "Improved" TV Solution for our Small Travel Trailer
Now I'm no expert at antennas. When you try to shop for one, it get's pretty overwhelming looking at all the options. For me, it was difficult to choose from their specs, but I had a few criteria that I focused on:Reception
It had to provide better reception than what we got with our simple antenna. To help, I decided to get one that included a pre-amp to boost the signal.Storage
Being easy to store and transport was also important to me. That meant it couldn't be too large, and also needed to be reasonably flat.Inexpensive
After looking at the price of roof-mounted antennas for RVs, I knew it wasn't worth that much to us. Plus, the installation was going to be more difficult than I wanted to deal with. After all, this is only for watching the news a bit, a little late-night TV, and possibly entertainment on a rainy day.
So I picked one on Amazon that looked good and ordered it. What we ended up with has worked pretty well for us. One thing I really like is that it comes apart by loosening just a few wingnuts, making it very compact to store.

Our "improved" TV antenna all set up on our small travel trailer

Mounting the antenna mast
Mounting the TV Antenna
Once I chose the antenna, I had to come up with a good way to mount it. My criteria here was pretty simple. It had to be quick and easy to set up and take down, and it also needed to get the antenna reasonably high off the ground, but still easy to store and transport.
I found a great solution for the mast. Home Depot & Lowes sell telescoping painter poles. These are normally used to attach a roller when painting high walls. They carry several options which collapse enough to fit in the bed of our truck, yet extend high enough to get the antenna far enough in the air for better reception than our simple antenna.
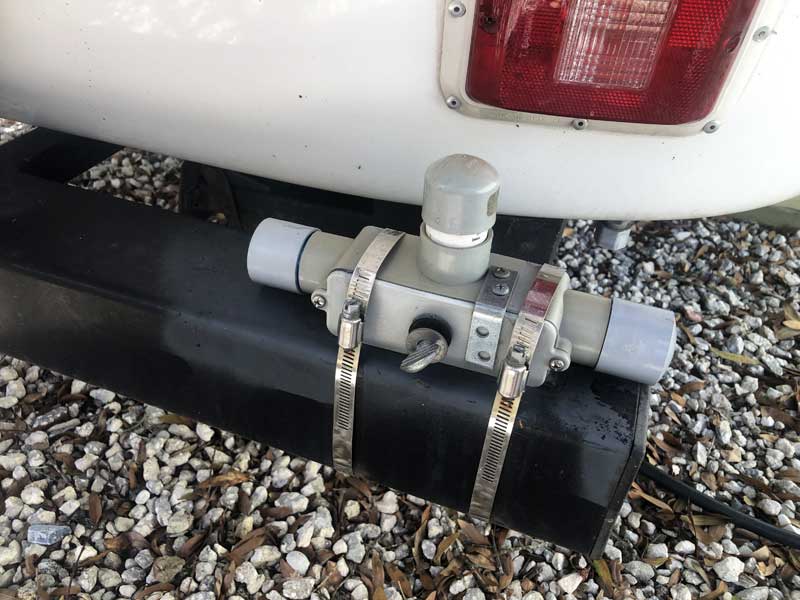
Mounting the antenna is where my device at the top of the page finally comes in. It's an electrical junction box designed for attaching three sections of one inch conduit. I mounted it to the rear bumper with large hose clamps. The caps are for keeping the water out when not in use, and were made by mounting female end caps to two inch long pieces of conduit. I drilled a hole through the cover for a bolt that threads into a nut that I epoxied to the inside.

The power supply for the preamp
Inside the Trailer
The antenna we purchased included a preamp to boost the signal. It's a small plastic box mounted to the antenna. To work, it needs a power supply that is connected between the antenna and the TV.
The white box in the photo above is the power supply. I have it located in a cabinet inside the trailer, just above where the TV is mounted. This is where the end of the pre-wired cable is that came with our Casita. I connect the cable to the power supply, then added a short cable from the it to the TV connector. I ran the power cord through the cabinet, and plug it into the outlet with the TV below.
Setting It Up at the Campground
Set up is simple:- Assemble the antenna, mount it to the top of the painter's pole, and attach the coax cable. (There are only four bolts with wing nuts that need to be inserted and tightened by hand.)
- Remove the top cap from the junction box, then fully extend the painter's pole and insert the handle in the hole.
- Use a few clamps to fasten the pole to the trailer side, and hand tighten the bolt in the junction box to hold the pole after adjusting it to point the antenna in the desired direction (see next section).
- Attach the cable to the trailer connector.

Antenna.web station map
Aiming the Antenna
Once you have the antenna set up, the pole needs to be turned to aim the antenna in the correct direction. We start by referring to Antenna Web. When you click on the link, it will take you to a page where you enter an address. You will then get a map displayed like the one above, showing you the location of the stations. While this is a good starting point, there are two problems we run into:- Sometimes big trees and big RVs near are trailer interfere with the direction of the signal. It generally takes me on the outside of the trailer tweaking the direction of the antenna, with Fay on the inside telling me when the TV has the best picture.
- Most of the time, there are multiple stations located in different directions. You may have to go outside and adjust the antenna direction if you want to watch a different channel
By the way, these are only issues with a directional antenna like our upgraded one. Our simple antenna picks up signals from all directions, just not that far away.
All in all, the setup is quick and easy. It rarely takes over 10 minutes total.This Was a Great Project
Two things made this project easy for me:- First, was that our trailer was pre-wired for the TV. The only change I had to make to the wiring was to add the power supply to the inside end of the cable, and add the short cable to the TV.
- Second, was that our small travel trailer is a Casita. The entire body is molded fiberglass, with a band going around the center. This band gives me something to easily clamp the mast to.
While it won't pick up channels if we are camped in the woods...in the mountains...far from civilization, it does a pretty good job if there are stations within a reasonable range. The best parts are that it was inexpensive, and it's easy to set up, take down, store and transport.
You may have some additional work and things to figure out if your trailer is not prewired for cable or an antenna. Hopefully though, you can pick up and idea or two from what's worked out well for us. Be sure to drop me a note if you have any questions.
- Denny

Denny Johnson
After having spent most of our adult life in Orlando, my wife Fay and I moved to Knoxville, TN in 2020. We are loving the change of seasons and being near the mountains. Plus, this part of the country is loaded with great places to camp.We camped years ago with a pop-up camper, but got serious about it when we purchased our Casita in 2014. There was a lot to learn as we started traveling with it, and a lot of conflicting opinions on line. That's when I decided that creating a website would be a good retirement project. I started tinyTowable.com to share things we've learned along the way that have worked well for us in hopes that the information would be of help to others.
However, since moving to Tennessee, I've gotten involved with new hobbies (you can check some out on my personal website at https://www.softrite.com) and we haven't camped very much. So, at the end of 2023, I made the tough decision to stop updating this website.


Description
Item 1 - Simple TV Antenna - This is an upgraded version of the simple antenna we have. It extends a full 30", 2-1/2 times as long as ours does. There is also a change in that the antenna screws on to our trailers cable connector instead of pushing on. I would think the additional expanded length could provide some improvement in reception.
Item 2 - Upgraded TV Antenna - This is also a slightly improved version of the upgraded antenna we have. It's very similar, but has an extra (longer) element which should help with reception on VHF channels (2-13).
Why I like it
Item 1 - Simple TV Antenna - Small, very compact, easy to setup and store, very inexpensive, works well for areas when signal strength is pretty strong
Item 2 - Upgraded TV Antenna - Decent reception when stations are further away, quick and easy to setup, easy to disassemble making it easy to store and transport
9 thoughts on “Improving the TV Reception in Our Small Travel Trailer”
We have been looking for a cheap, easy, antenna solution that does not require drilling holes in my Casita. I plan to order the parts from your links. Thank you so much for your explanation and photos. I have just a couple of questions. First, which painters pole do you use? The link gives a list. I see one that is 20′ long, and collapses to 7 feet. Does the butt end of the pole fit inside that 1″ conduit hole? You use a junction box with conduit connections on the end. Those end connections are not needed for this application at all, are they? And finally, do you leave the junction box on the bumper all the time, and just store the pole and antenna, or do you take the junction box off for travel?
Hi Frank,
Glad you found the article helpful. I actually have two painter poles which I purchased at Home Depot. I just put the Amazon link on the article because I thought it might be easier for someone if Home Depot is not close by.
I’ve had the electrical box mounted for a couple of years, and never removed it. In fact, I actually have one mounted on each end of the bumper, and use the other one for a cellphone antenna. If you look closely, you’ll see I goofed up and it’s not the same box in all of the photos. The handles on the painters poles I have fit nicely inside the one inch holes in the box.
I check your tow vehicle and make sure how long a pole you can conveniently carry. I know the if mine were another inch or so longer when collapsed, they would not fit in the truck bed.
– Denny
Great article! Hope to see your set up in person in January.
I found a three section painter pole that gets me to 10′ and fits in our 6′ pole transverse storage pipe behind the tongue box. I used a 4″ SS bolt up through our rack and drilled a hole in the pole handle. I am using suction cups for other purposes and they would work for the pole. Cell antenna mounts above the King Jack TV antenna. Wineguard has an App that tells you where and how far TV station transmission towers are.
Just saw info on Facebook, very helpful! Downloaded your website. Great ideas .
Thank you!
Glad you found it worthwhile Tom. Thanks for the feedback!
Shorten outside cable and reception will improve even more. Be sure to leave it still sag some so water drips down instead of in. I even went one step further. First I measured how much cable I needed. Then when the cable guy was in my neighborhood I asked him to make me a cable. Their cable is a higher quality and now shorter distance made the difference. Happy camping!
Great suggestion!
https://www.instagram.com/p/B79k26iJhA8/
if you want it ‘outside’ then use a plastic box instead of a cardboard one.